Introduction / Tech-specs
CamSwitcher App is an ACAP application designed to run directly on a camera, enabling real-time video switching, stream management, and media integration without requiring additional hardware.
Key Points
- Runs natively on an IP camera as an ACAP application.
- Switches between multiple AXIS network cameras and video clips stored on the camera’s SD card or internal memory.
- Offers an audio mixer for up to two audio sources for the combined output.
- Live commentary available on PC browsers and the cloud mobile app.
- Generates a single real-time output video stream.
- Supports switching methods:
- Manual control
- Automatic switching via predefined playlists
- API-triggered switching commands
- Automatic, using Motion Tracker detection for Basketball.
- Retrieves RTSP video streams from connected cameras.
- Final mixed stream can be broadcast easily using the CamStreamer App.
Technical specifications
- Application type: In-camera ACAP app uploaded via browser or API.
- Compatible cameras: All cameras with ARTPEC 6/7/8/9 chipsets from Axis Communications.
- Trial: 30 days.
- License: One-time purchase or monthly cloud subscription.
- Licensing methods: UI (internet required) or API. Offline licensing here.
- API: Supported.
NOTICE
For more information, please refer to this datasheet.
Installation
Download the Application
- Open the compatibility/download page.
- Verify your camera model is supported.
- Download the CamSwitcher ACAP package.
Install the App on the camera
- Enter the camera’s IP address in a browser.
- Log in with administrator credentials.
- Open the camera’s application/ACAP management section.
- Upload the CamSwitcher package file.
- Start the application.
HINT
If you wish to license the App in an offline environment. Please refer to this guide.
Setup
CamSwitcher Main menu illustration.
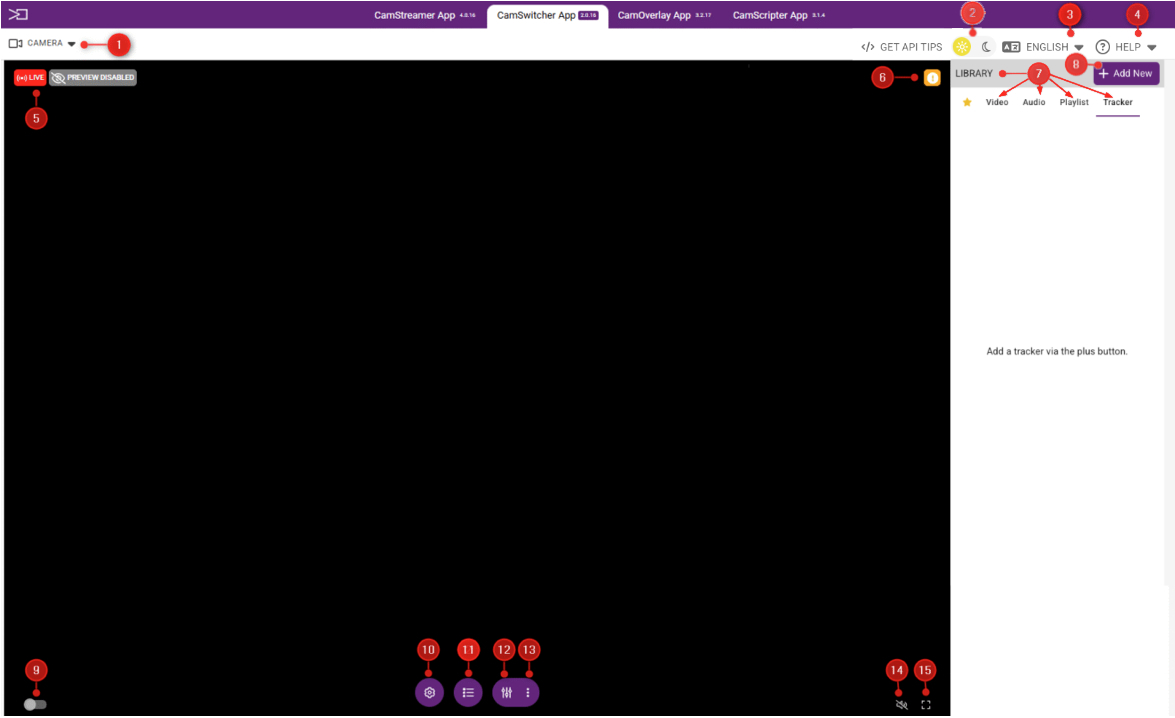
1- Camera Tab (accessing various camera functions)
2 – Dark/Light mode toggle
3 – Drop down Tab to select language
4 – Drop down Tab to select various Help options
5 – Live/Preview information
6 – Player Preview notification
7 – Library displaying various added items
8 – Button for adding various library items
9 – Toggle for enabling/disabling live view
10 – Global settings
11 – Master audio settings
12 – Microphone audio mixer
13 – Microphone and secondary audio mixer
14 – Preview player mute toggle
15 – Preview player full screen toggle
Video
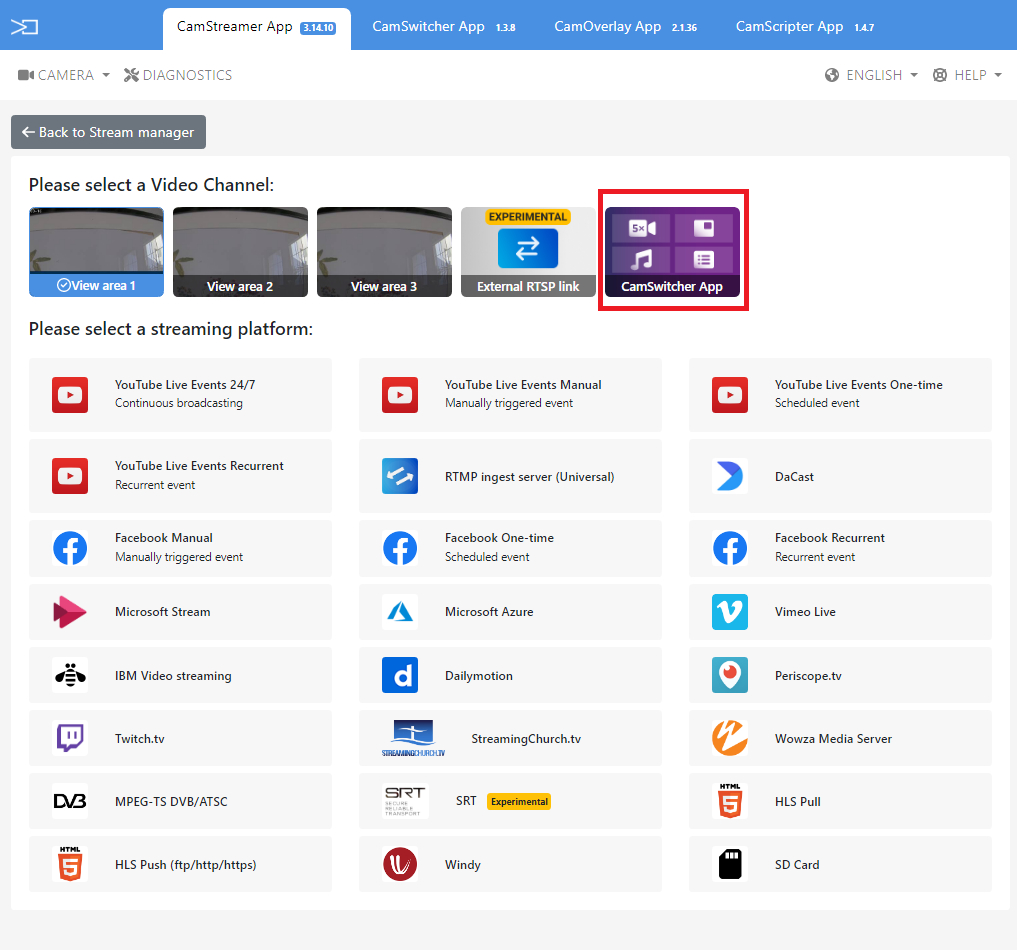
Enable live streaming from CamSwitcher
When creating a new stream via the Camstreamer Stream Manager, select the appropriate video channel (CamSwitcher App). This enables the CamSwitcher App to be the default view/application for live streaming.
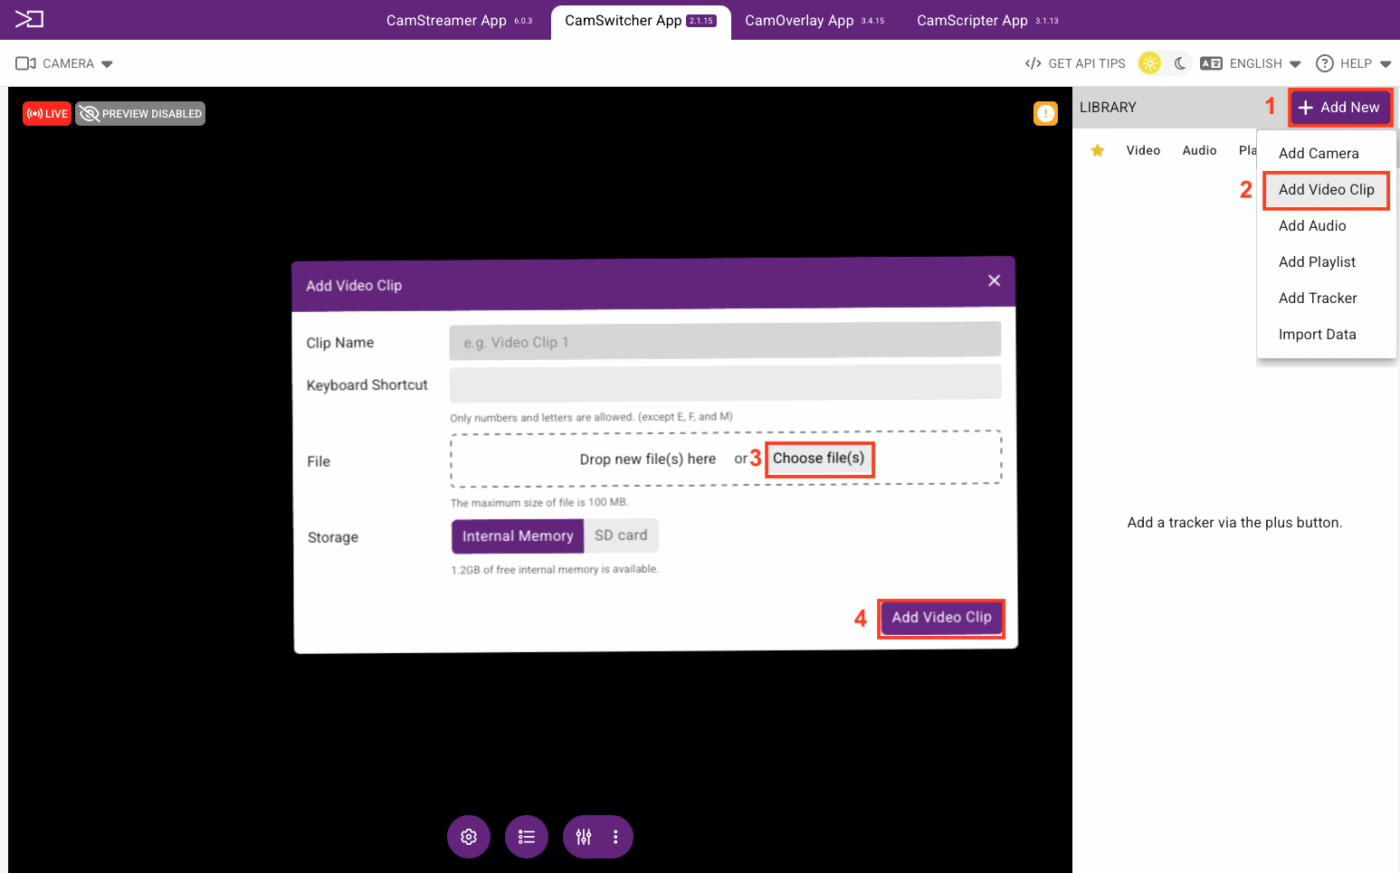
How to add a video clip in CamSwitcher
1- Press “Add New”.
2- Add Video Clip.
3- Choose your file.
4- Add your video clip.
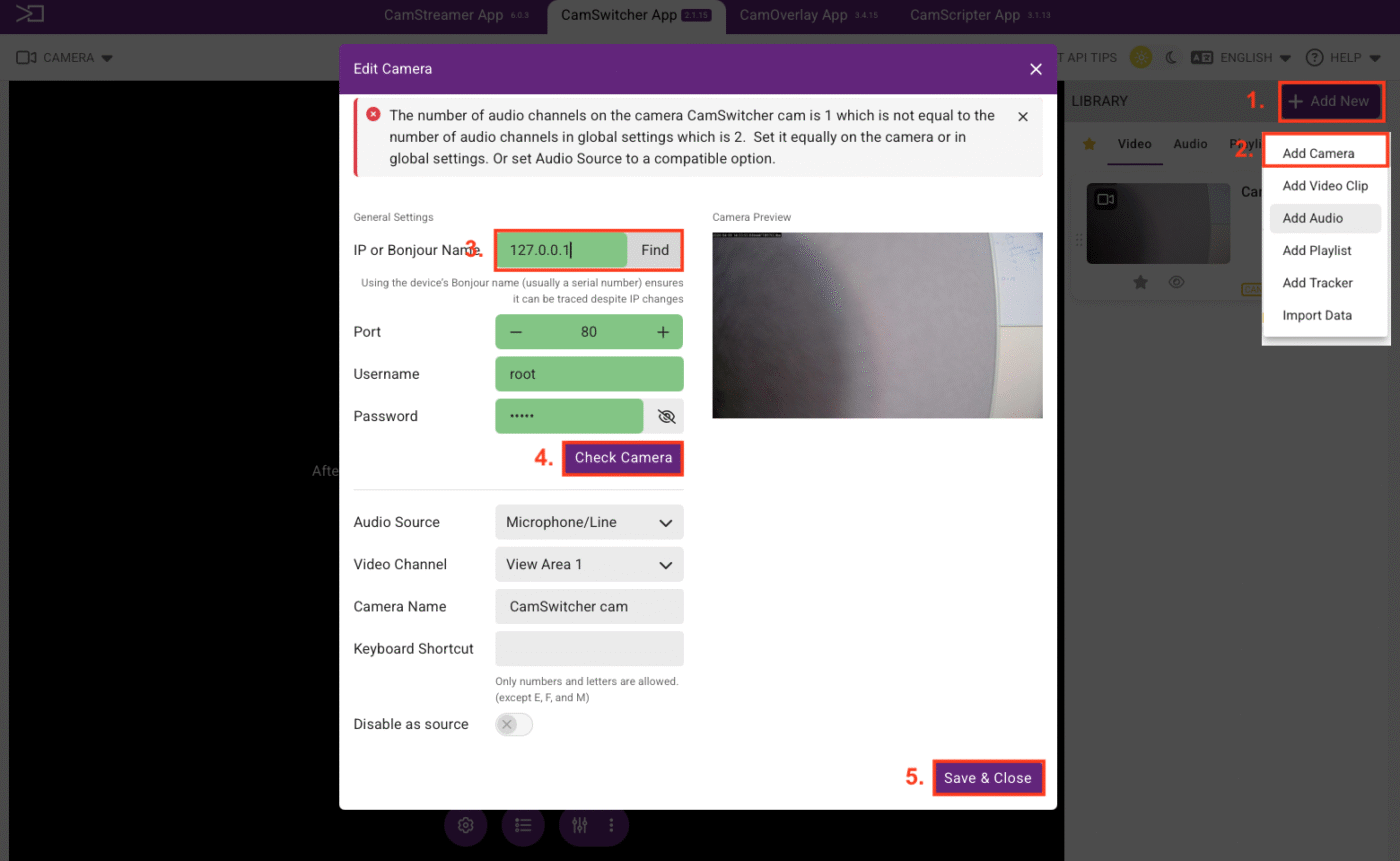
How do I add a camera in CamSwitcher app?
1- Press “Add New”.
2- Add your camera.
3- Enter the IP address of the cam or press find to locate the camera on your LAN automatically. Enter the camera password.
4- Press Check Camera to confirm that the camera is connected to the CamSwitcher app.
5- Add camera (this will add the camera to your list of connected cams in the CamSwitcher app).
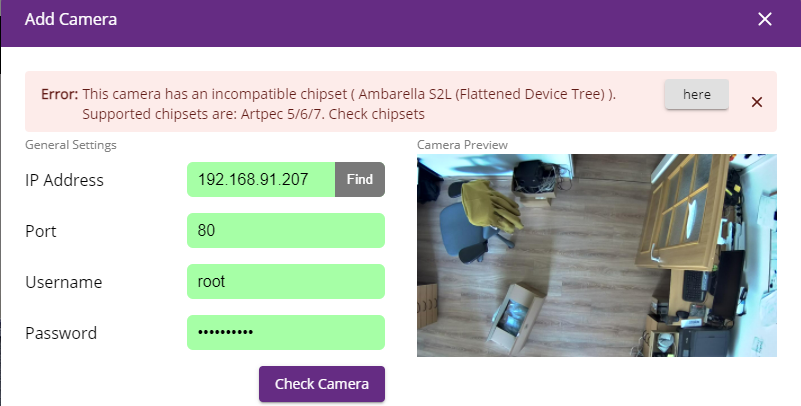
ERROR: This camera has an incompatible chipset.
ERROR: This camera has an incompatible chipset.
You have attempted to add an incompatible camera, to the CamSwitcher App.
Click the “here” tab to see the list of compatible cameras suited for the CamSwitcher App.
Audio
CamSwitcher secondary audio
To enable the option of using 2 audio sources at the same time
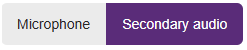
1- Select the mixer button to enable the Audio mixer/Secondary audio settings.

2- Select the Secondary audio option.
3- Select the appropriate audio channels from the drop down list and adjust the volume sliders.
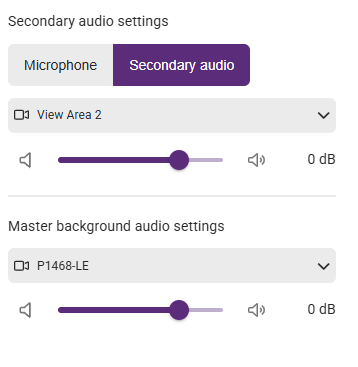
4- Put the Audio mixer to the on mode.
CamSwitcher audio commentary
To enable the option of using a microphone alone, or in conjunction with an audio source at the same time:
NOTICE
Using audio commentary only works via accessing the cam via https, not http.
1- Select the mixer button to enable the Audio mixer/Secondary audio settings.
2- Select the Microphone option and then select the appropriate microphone from the drop-down list.

3- Select the Master background audio settings if you wish to add background audio as well, if not select none from the drop down list….balance out the volume sliders to your preference.
4- Put the audio mixer to the on mode.
Warning: The audio channel does not match the global setting
NOTICE
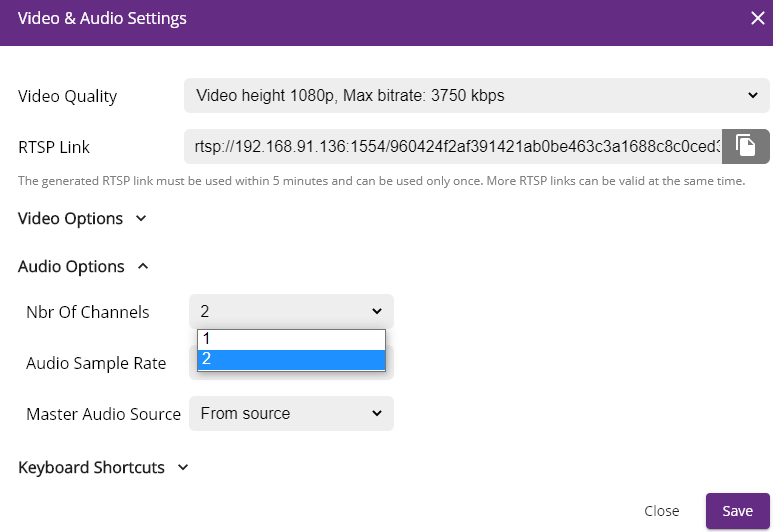
In the Global video and Audio settings located in the Audio tab there are 2 options for audio channels, Channel 1(mono) & 2 (stereo)
When you are adding a camera to the CamSwitcher app, the majority of cams are 1 channel (mono).
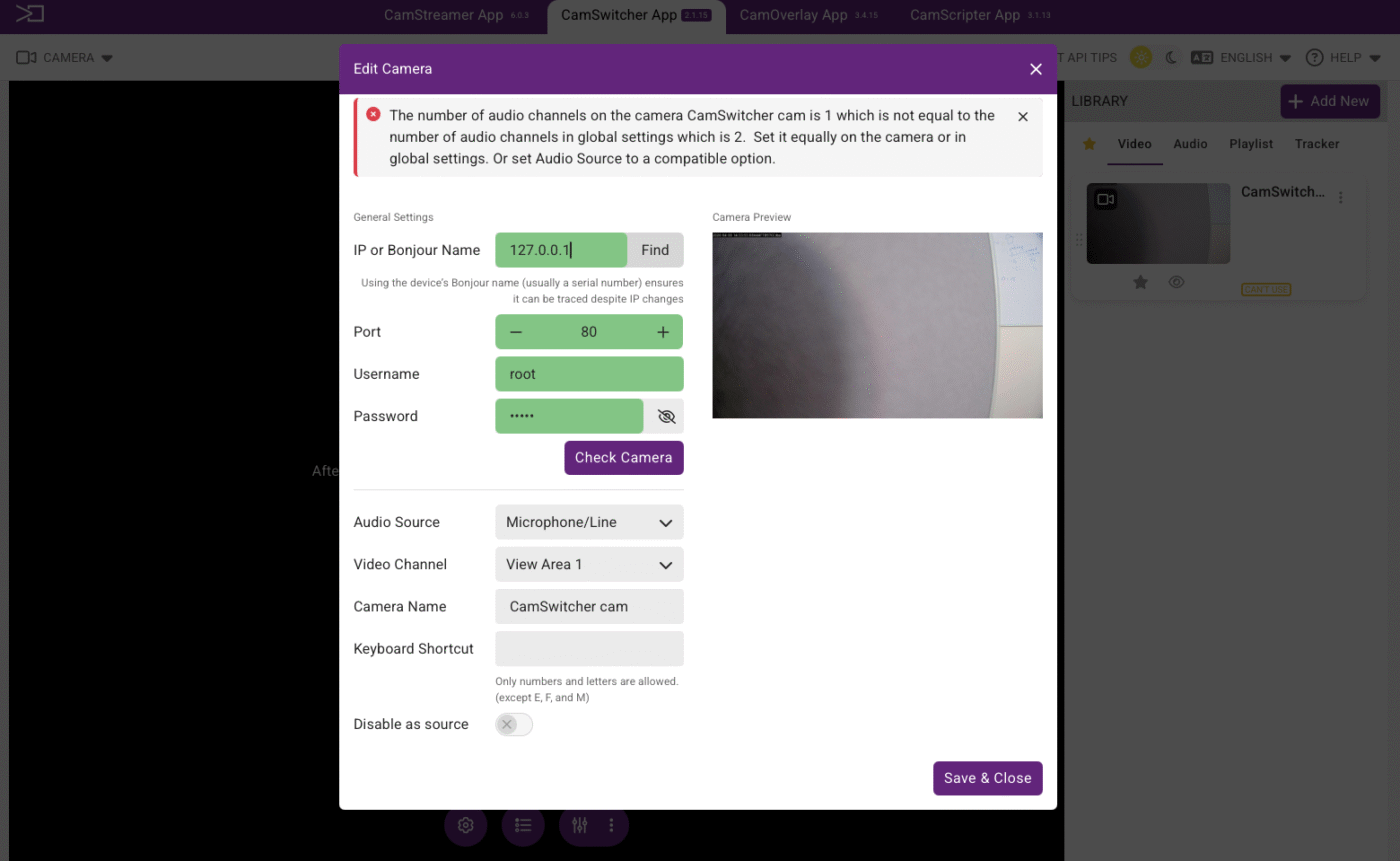
Simply changing the setting from 2 channels(stereo) back to 1 channel(mono) solves this issue.
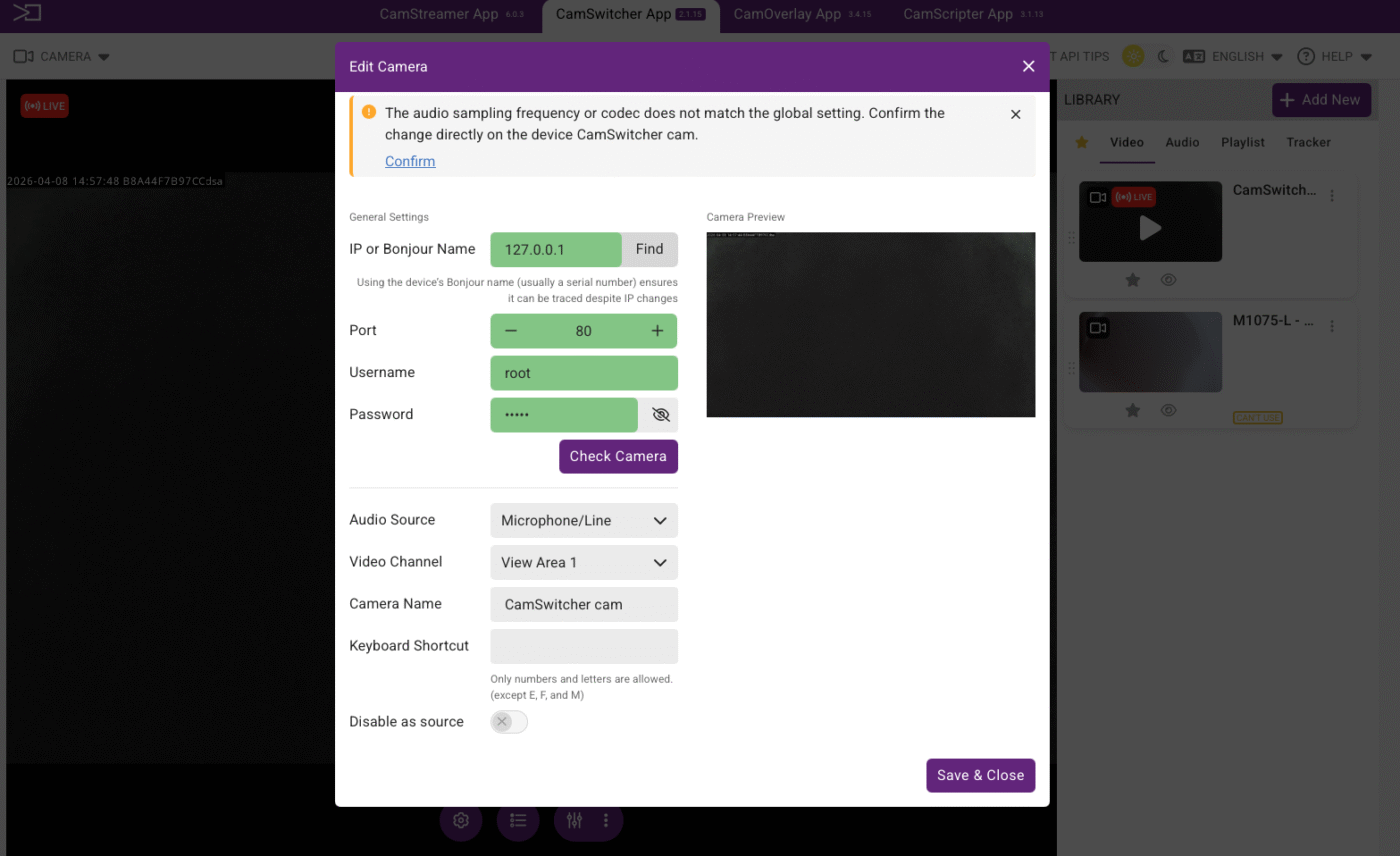
Warning: The audio sampling frequency does not match the global settings

This error will occur when the camera which is been added has an audio sampling frequency preset that is different from the current audio sampling frequency in the global settings on the CamSwitcher app.
For example:
Global settings: Audio sampling rate = 44.1 kHz
Camera settings: Audio encoding = 32 kHz
By pressing Confirm, the audio encoding on the cam will be changed to 44.1 kHz.
The camera will now be added to the CamSwitcher app.
How do I add an external audio file for (Audio Playback)
To add an audio file into the CamSwitcher app
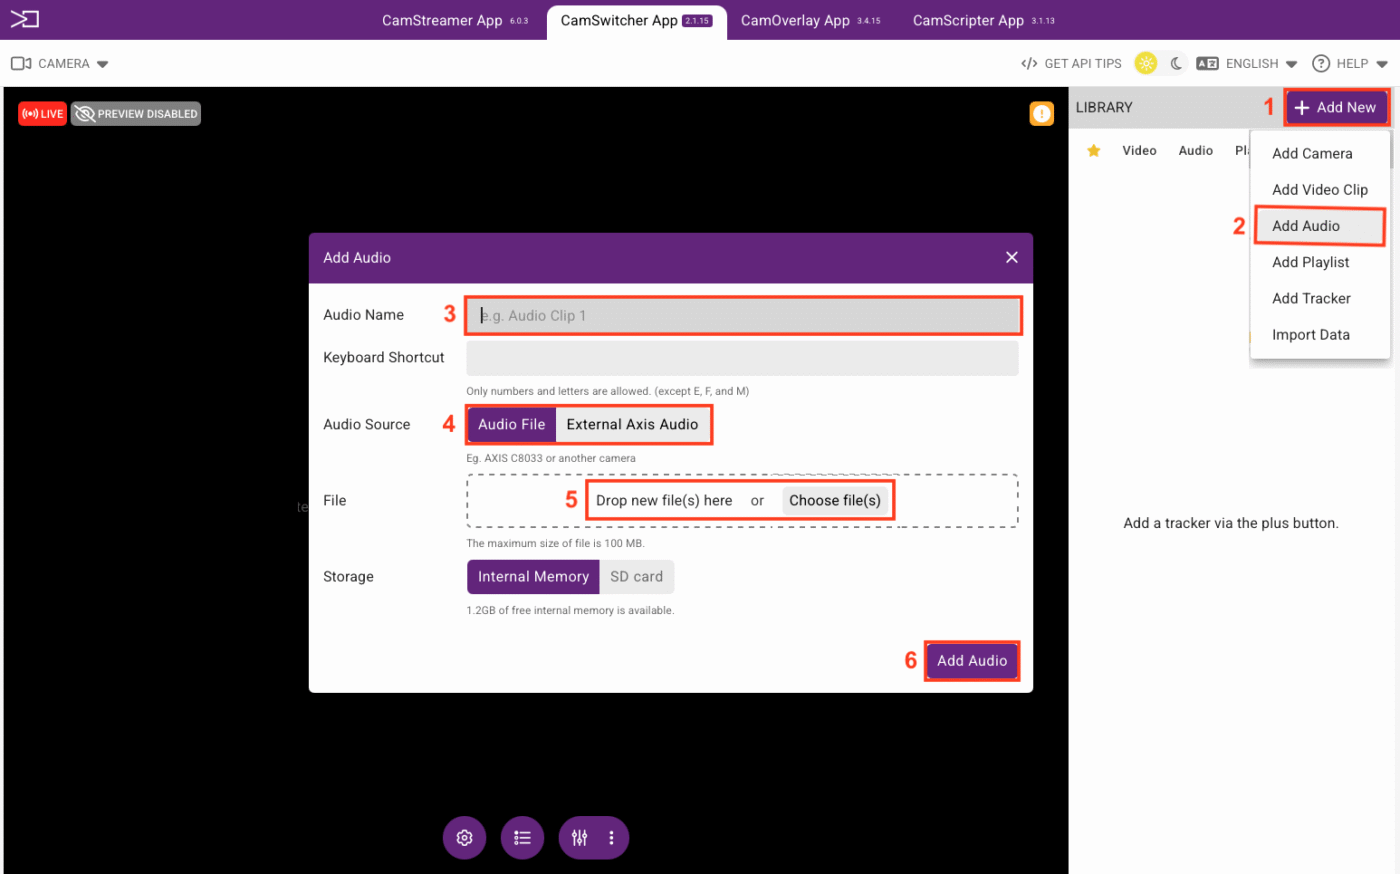
1 – Press the “add new” button.
2 – Add audio.
3 – New name of the clip which is going to be selected.
4 – Select the location of the file to be uploaded.
5 – Select the file.
6 – Add the file.
The audio sampling frequency or codec does not match the global setting
When adding a cam into the CamSwitcher App, by default, the audio source is on Mic/Line.
If your Global Audio Settings are set as a different source, then there is a conflict of audio channels.
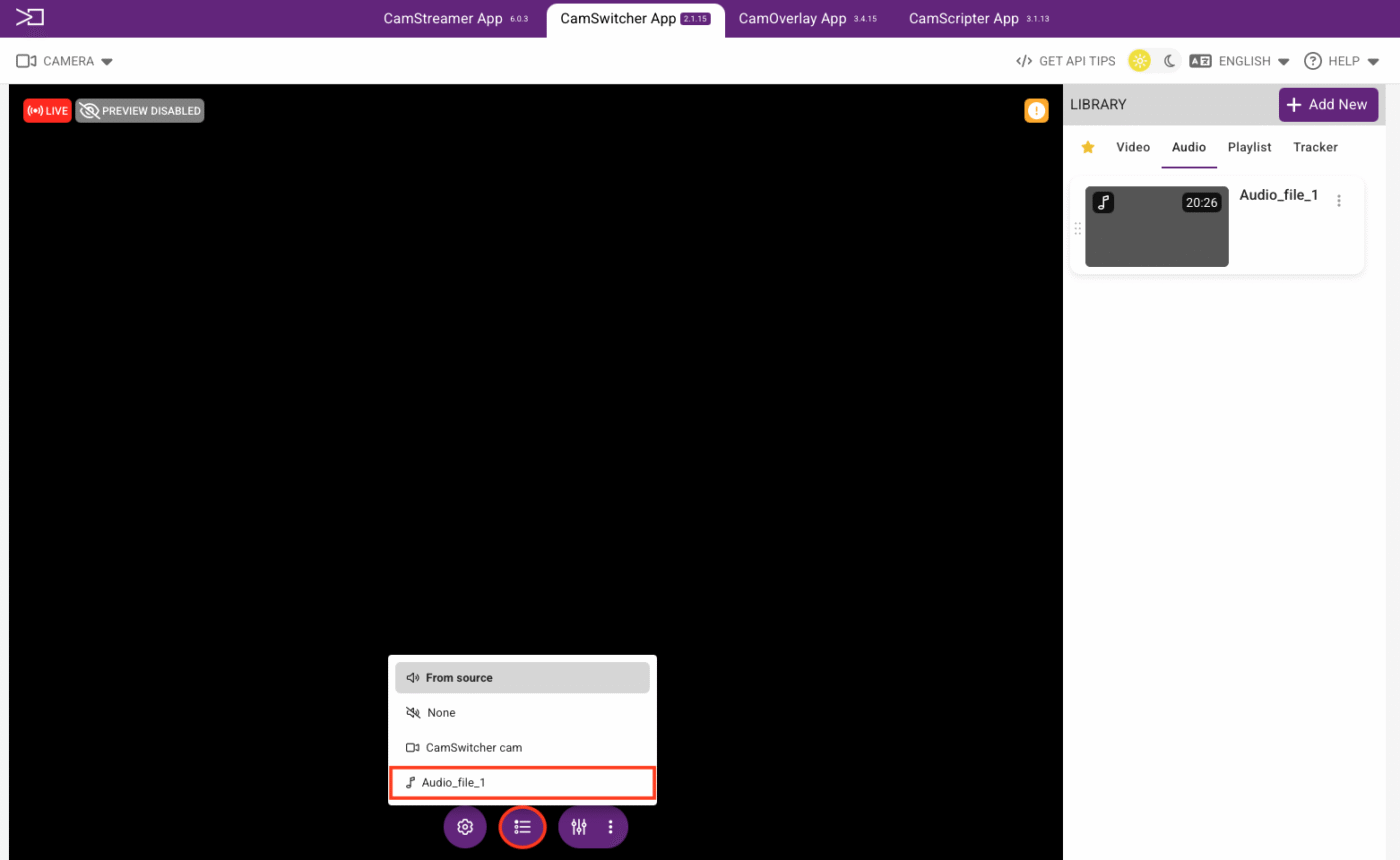
I have added an audio file for playback (background music), how do I edit it for live streaming in my playlist or Live view.
For Live view:
On your Live View Global settings:
1 – Press the icon.

2 – Choose from the dropdown menu your preferred audio file for playback. The audio file will play back uninterrupted in a continuous loop.
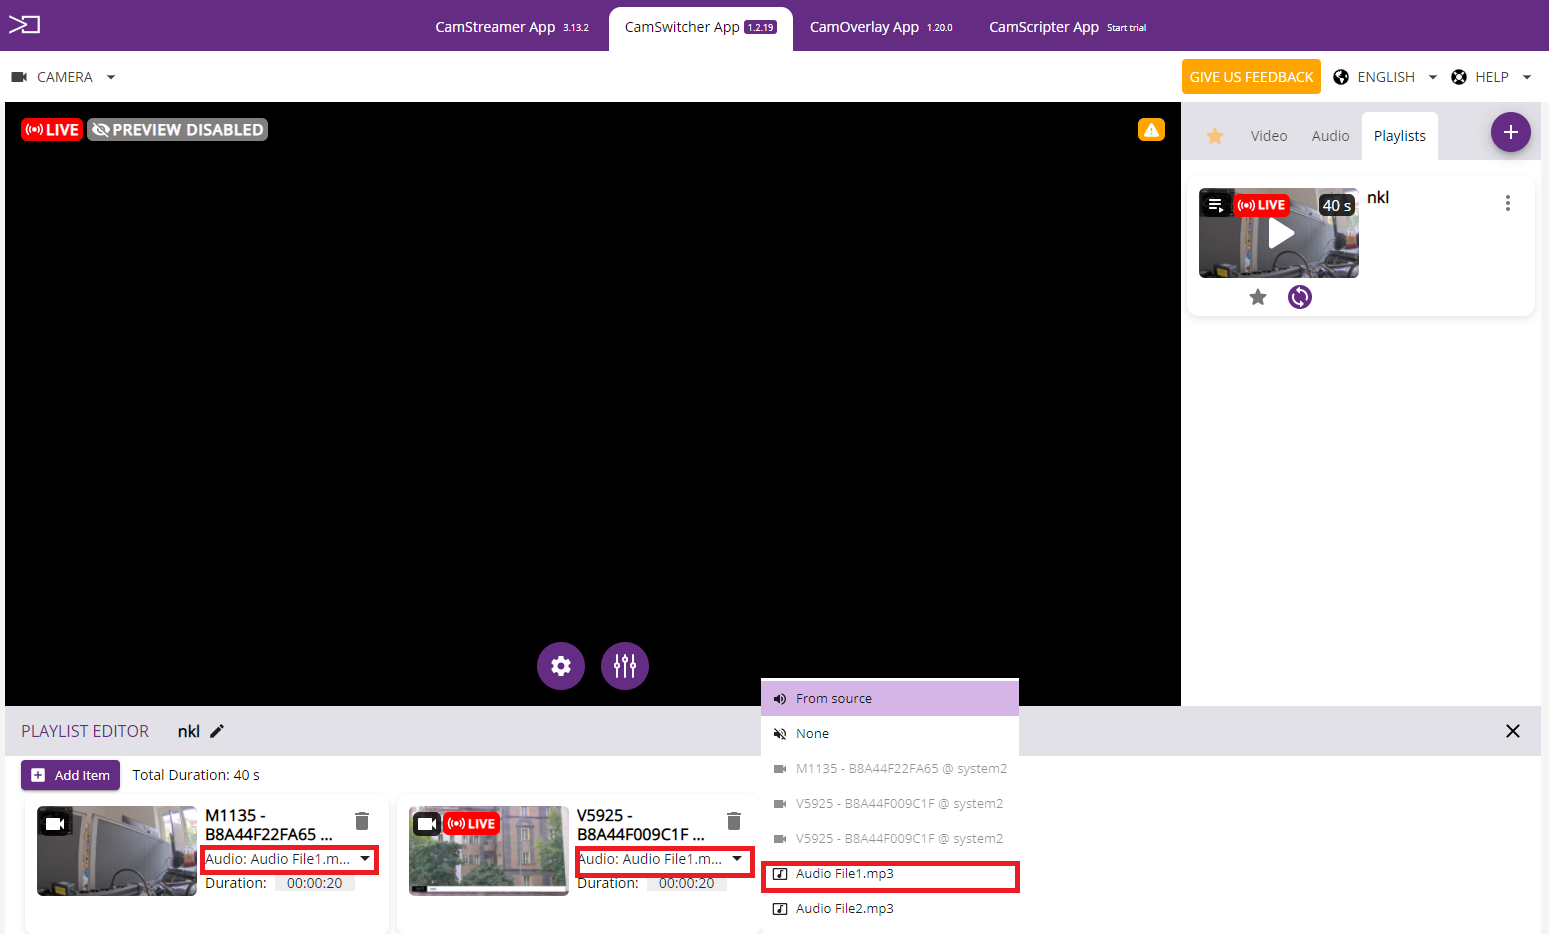
For Playlist:
If you edit the the audio playback option in the playlist editor section, then your background music will run and the audio will restart every time with your defined camera sequence allocated settings.
Which external audio sources are compatible with CamSwitcher.
External audio can be sourced from your Audio Equipped Axis camera.
In addition if your cam does not support audio capabilities and you wish to capture Live Audio then we suggest the following Axis I/O audio module:
The C8033/C8110 Audio Bridge and the P8221 Audio Module.
The P8221 audio module is not supported at this time.
If you require standalone microphones to plug into these units please see the axis Product link:
https://www.axis.com/en-fi/products/standalone-microphones
WARNING
The Axis T6112 audio I/O interface can only be used via plugin into an Axis cam that has the audio input option. The audio source would then be derived from the cam the T6112 unit is plugged into. But this unit is not compatible with all Axis cams.
Here is the list of compatible cams for Axis T6112audio module:
https://www.axis.com/products/axis-t6112-audio-and-io-interface#compatible-products
Playlist
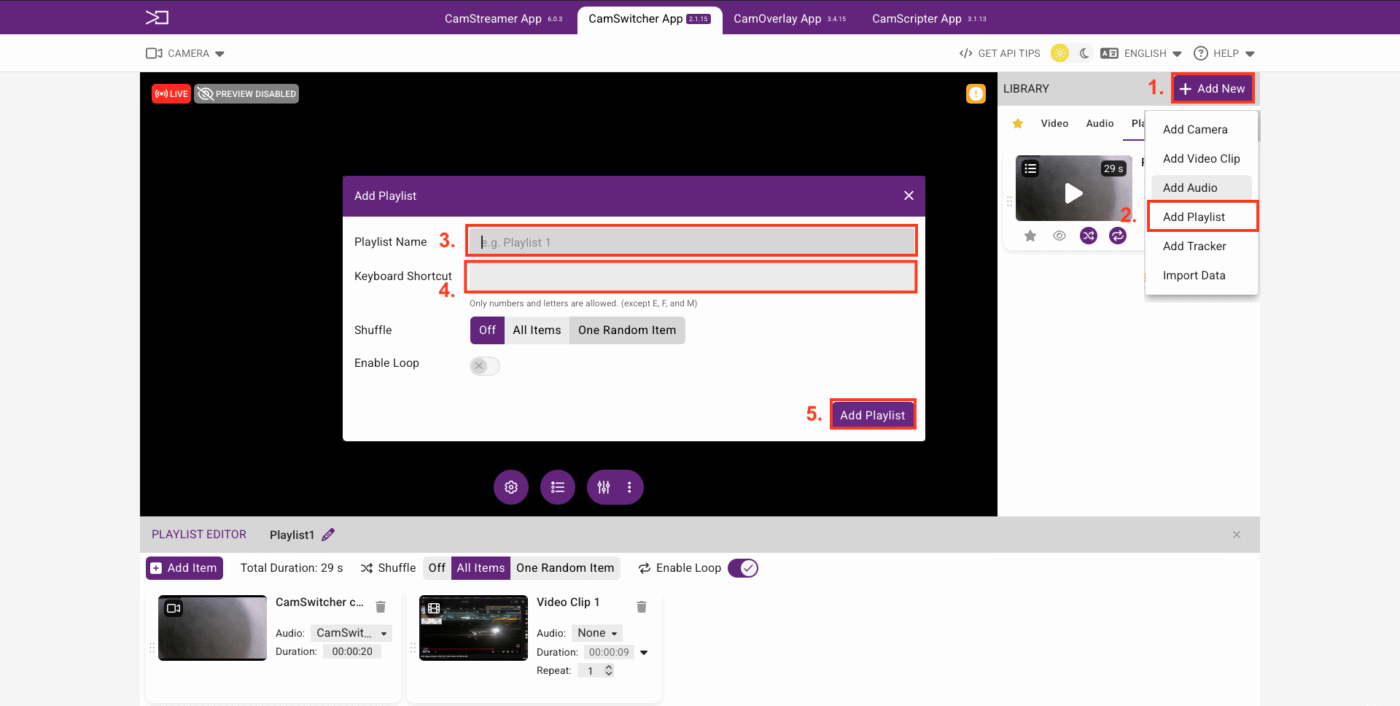
How to create a playlist in Camswitcher
How to create a playlist.
1 – Click on the icon “Add New”.
2 – From the drop down menu select: Add Playlist.
3 – From the pop up tab: enter the name of the newly created playlist.
4 – Dedicate a keyboard shortcut, if so desired.
5 – Confirm to add the playlist
CamSwitcher playlist editor interface illustration
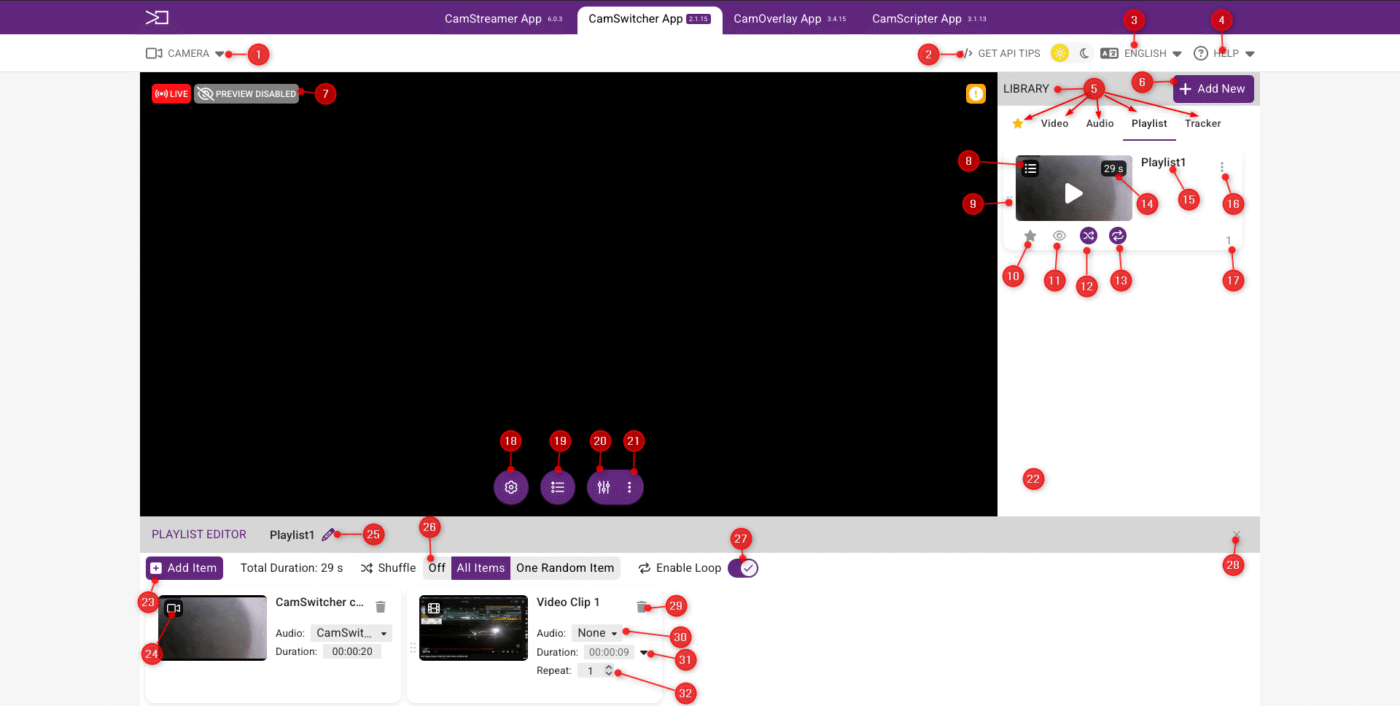
- 1 – Camera Tab (camera information)
- 3 – CamSwitcher language options
- 5 – Library (contains all imported media)
- 7- Status of preview
- 9 – Drag and drop icon
- 11 – Preview icon
- 13 – Icon displaying status of loop option
- 15 – Playlist name
- 17 – Assigned playlist keyboard shortcut
- 19 – Global audio setting
- 21 – Mixer settings button
- 23 – Adding items to playlist
- 25 – Edit playlist name/keyboard shortcut
- 27 – Loop On/Off button
- 29 – Delete item from playlist
- 31 – Duration of the item in the playlist
- 2 – Tips for API usage
- 4 – Help section/license info
- 6 – Plus button (adding items/media)
- 8 – Icon displaying playlist
- 10 – Icon for adding playlist to favorites
- 12 – Icon displaying status of Shuffle option
- 14 – Total playlist time indication
- 16 – Icon to edit/delete the playlist
- 18 – Global settings
- 20 – Mixer On/Off button
- 22 – List of playlists
- 24 – Item type icon
- 26 – Shuffle mode switch
- 28 – For closing the playlist editor
- 30 – Option for selecting audio for related media
- 32 – Repetitions of the item, when played
Editing the items in the Playlist Editor
Only cameras and video clips can be added to the timeline of a Playlist.
All items displayed in the playlist editor’s timeline are interchangeable by the left-click drag-and-drop mouse function.

Audio options for each individual cam/clip can be edited:
- Press the audio feature to enable a Popup tab.
- From the Popup tab select your preference.
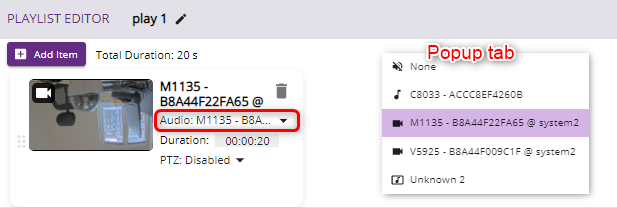
NOTICE
If the preference is to use different audio sources in the playlist, then the master audio should be set to “source”.
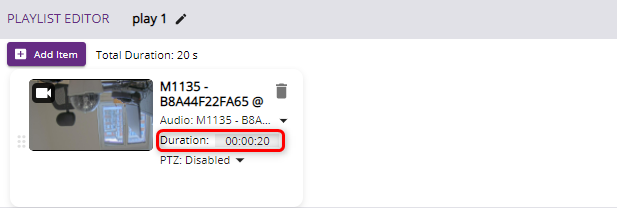
The duration of the cam/clip can be edited:
- Click on duration
- Edit the time as per your preference
Remove/delete an item from the playlist.
To delete an item from the timeline, press the “trash” button.
Add items to the playlist
How to edit a playlist.
Upon creation of a new playlist, you will proceed with adding items (video clips, cams, audio clips) from the CamSwitcher library.
This operation can be performed in 2 ways:
- 1 – Add an item from the Playlist editor
- Press “Add Item”.
- A pop- up window will appear displaying all items available for selection from the library.
- Click to select the items and press “Add to Playlist”
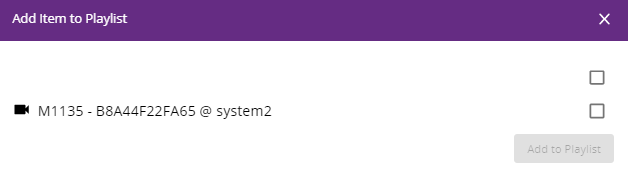
You have now configured a playlist.
- 2 – Drag and drop from the CamSwitcher interface.
- From the items of choice in the library, left-click and hold with the left mouse button and drag and drop the item on the playlist timeline, in the playlist editor.
- Perform this action repeatedly with all the items you wish to bring into the playlist.
You have now configured a playlist.
Tracker
Tracker setup video tutorial
Motion Tracker
What is the function of the Tracker
The Motion Tracker is currently designed to automatically track motion in a Basketball event.
In this type of sporting event, all players follow the ball, and therefore, the Tracker can exclude the area which is without movement. The Motion Tracker switches between the connected cameras and their view areas or PTZ positions, to one outgoing stream based on the movement in the video feed from the camera.
How to set up the analytical and tracking zones
Firstly, you have to create an analytical zone that is used strictly for deciding which camera will be played. Try to exclude all disruptive elements like the audience in the auditorium or a coach entering the playground. Also, consider that the view area should be without any graphics (create a view area just for analytics). An example of what the settings could look like is below.
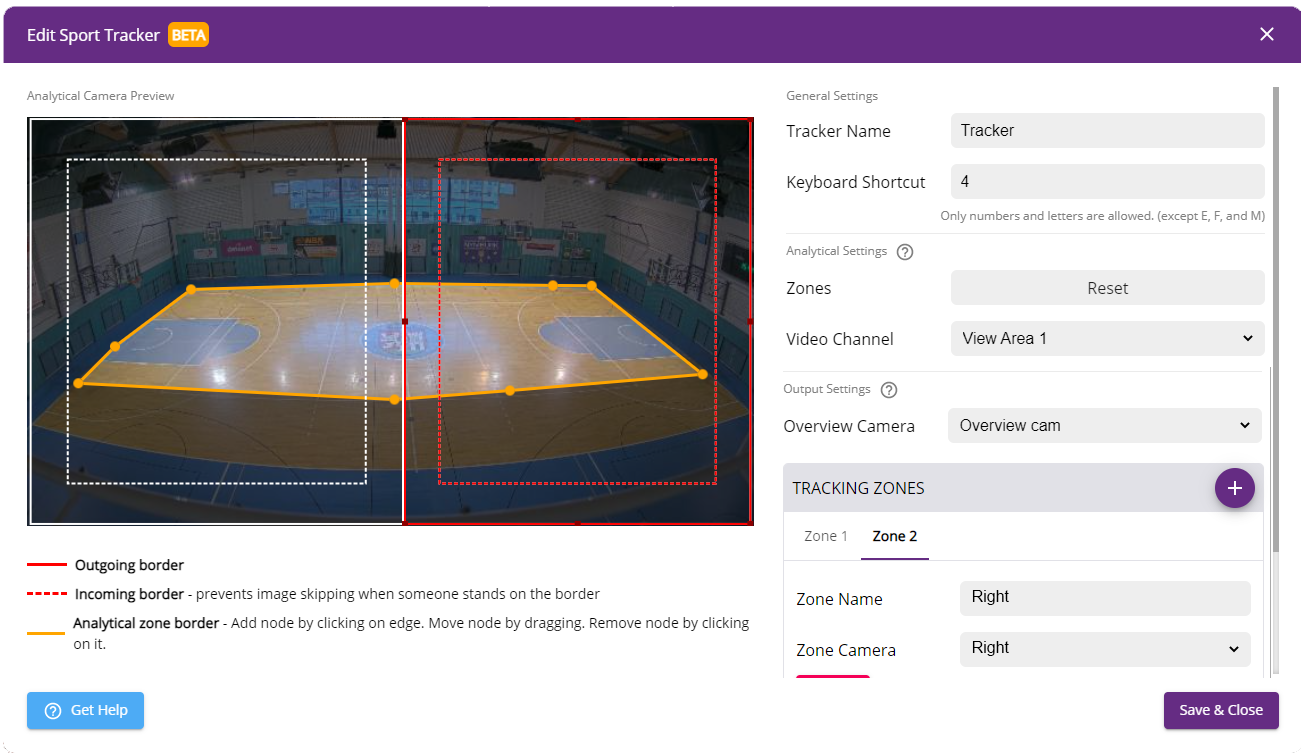
In most cases, you will need left and right tracking zones. Draw two rectangles above the analytical area you wish to allocate as zones. The Tracking zones should not overlap each other. Movement within the intersection of the analytical and tracking zones are considered for switching between added cameras.
How the switching to particular zones is performed
In the case of when you have two tracking zones it works as follows:
- Movement is in both tracking zones – overview camera is used for broadcasting.
- Movement is only in one tracking zone – camera assigned to that particular tracking zone with movement is used for broadcasting.
Consider that the outer full line of the border is used when somebody leaves the zone and the dashed line is used for incoming players. It prevents image skipping when someone stands on the border.
How the Motion Tracker can be configured
The Motion Tracker in the CamSwitcher App can be used in the following combinations. Nevertheless, the CamSwitcher App has to be always installed on the camera which provides the video data for analytics.
Example of one-camera installation: you can use a 4K camera e.g. P1378 and broadcast in FullHD. For the left and right cameras create two additional view areas each with FullHD resolution and place them in the corresponding positions in your image. The overview/analytic camera uses the entire picture from the camera in FullHD and the left and right zones will use the created view areas.
Example of multiple cameras installation – install one camera above the playground with CamSwitcher App and use it for the video analytics in the Tracker (when the camera is above the playground, you can eliminate disruptions). As an overview camera, use a camera placed beside the playground and for the left and right zones, use view areas from the same camera or separate cameras placed on their best positions, to enable capturing the left and right sides of the basketball court.
General
CamSwitcher App not being able to see/locate another Axis cam on the same LAN (local Area Network)
When adding your axis cameras to a switch, pay attention to not enable the VLAN mode on your switch.
VLAN mode configures ports on the switch into “protected ports” resulting in traffic not being able to be forwarded to any other port that’s also a protected port.
To be more precise no traffic at Layer 2 can be forwarded between ports on the same switch if both ports are configured as protected ports. A protected port’s traffic is unaffected to ports that are not also protected.
Cloud Recording
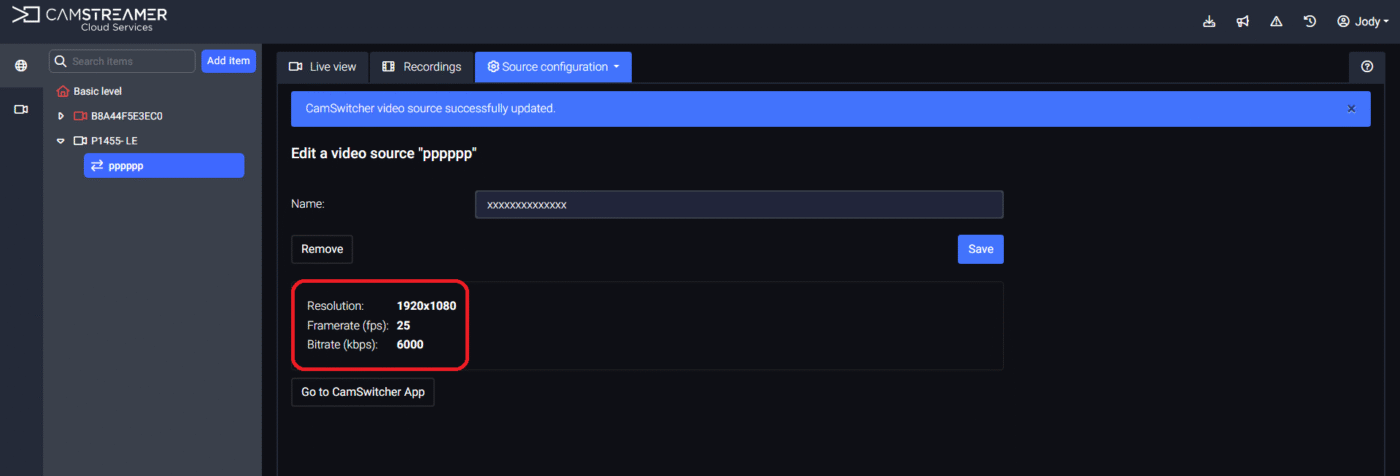
How to add the CamSwitcher video channel in the CamStreamer Cloud
Select the appropriate camera from the Item Tree, in the CamStreamer Cloud for which you wish to enable the CamSwitcher video channel.
Camera > Camera settings > Add a CamSwitcher app video source.
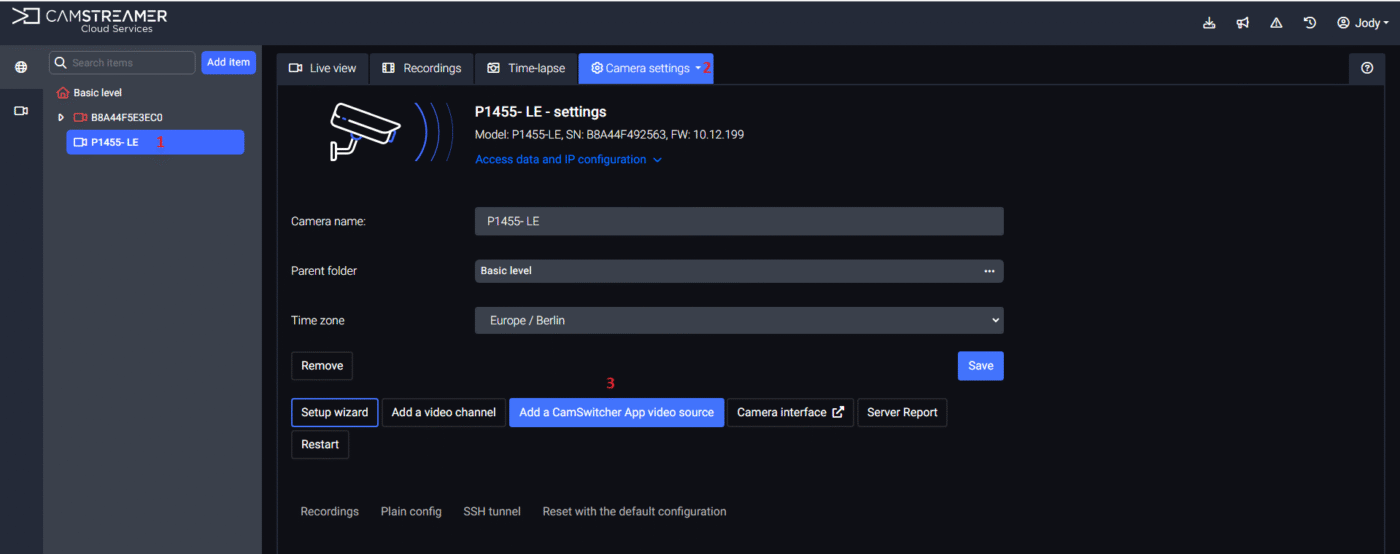
Enter an appropriate Name and press Create.

The global video quality settings will be loaded from the CamSwitcher app.
If you wish to change it select the Go to CamSwitcher app tab, to reconfigure it.
Press Save to finalize.